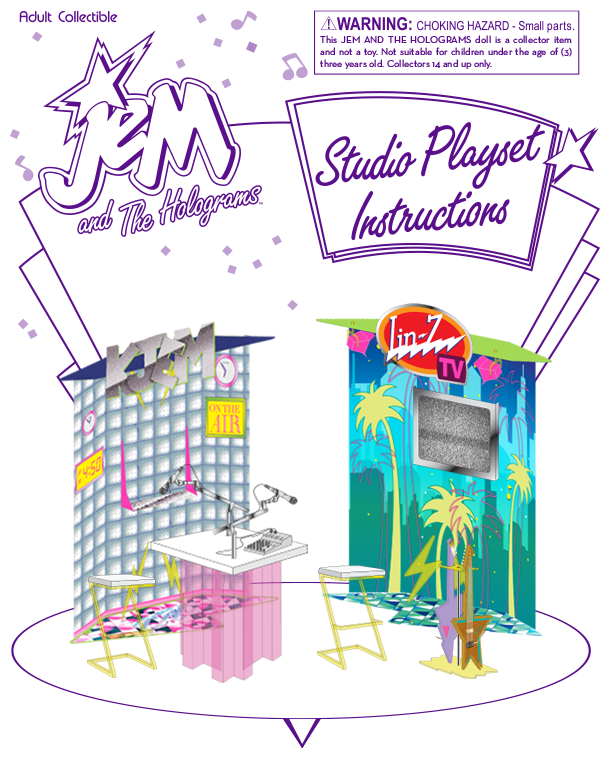
| Welcome to the online instructions for your new JEM AND THE HOLOGRAMS™ STUDIO PLAYSET! This new truly outrageous diorama will make your doll display pop like never before!
Please follow these simple steps to assemble your set and get the most out of it!
Material needed (not included):
- Small roll of clear double sided tape (i.e., 3M brand)
- Plastic model cement (i.e., Testor brand)
BASIC DIORAMA ASSEMBLY
STEP 1. PICK A SIDE!
This set contains all the components needed to assemble either the KJEM radio station or the LIN-Z TV studio set. Before you start, decide which side you would like to construct first!
STEP 2. BASIC STRUCTURE ASSEMBLY
Fold the main structure walls with the side you picked facing inwards. Gently bend on the crease lines to shape the diorama as shown.
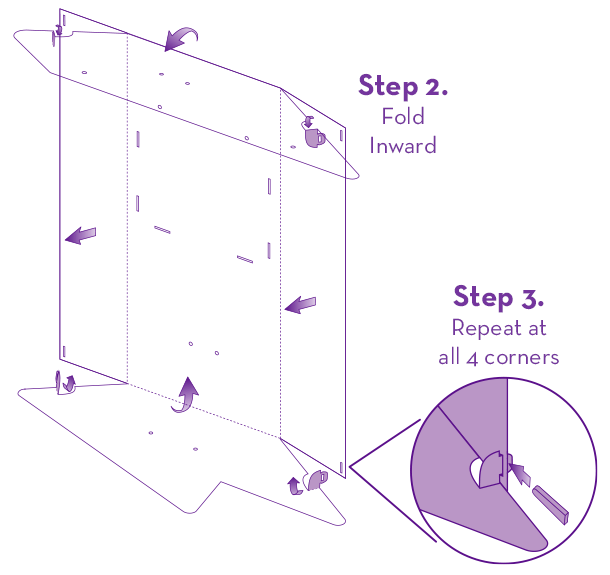
STEP 3. FASTENING THE WALLS
A/ Fold all four tabs up on the crease line as shown.
B/ Insert each tab into the corresponding slots on the side walls as shown and insert an acrylic peg into the opening to lock in place. Repeat for all four tabs (two on the floor and two on the ceiling). **PLEASE DO NOT USE EXCESSIVE FORCE OR YOU WILL DAMAGE THE CARDSTOCK!**
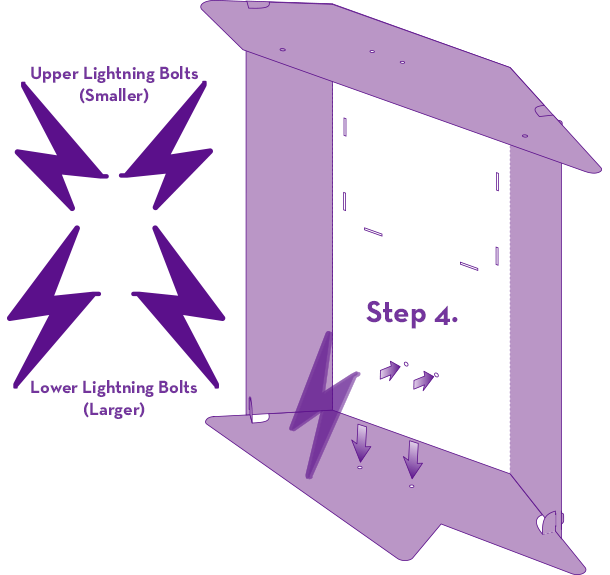
STEP 4. ACRYLIC LIGHTNING BOLT
The set includes four acrylic lightning bolts that are designed to click into the little holes at the back and on the floor and ceiling of the diorama. The longer lightning bolts are designed to fit into the lower wall and the shorter ones go on the upper wall. Install at an angle as shown.
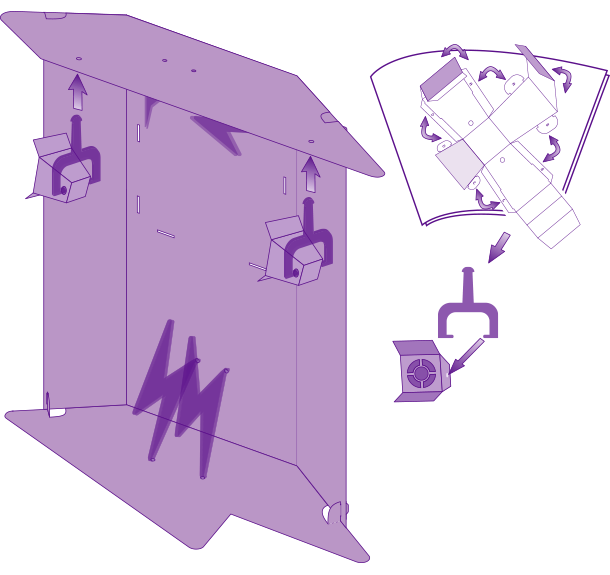
STEP 5. SPOTLIGHTS
Fold and install the two spotlights as shown. Note that they are designed to be used with either side of the set. Simply hang them from the ceiling using the included clips as shown.
CORRECTION:
Should one of the ceiling openings for the spotlight hooks be missing on your set, please use t the following template as a placement guide and use a paper hole punch to create the hole in the correct placement.
https://www.integritytoys.com/instr/14095_template.pdf
ASSEMBLY STEPS FOR LIN-Z STUDIO SIDE ONLY
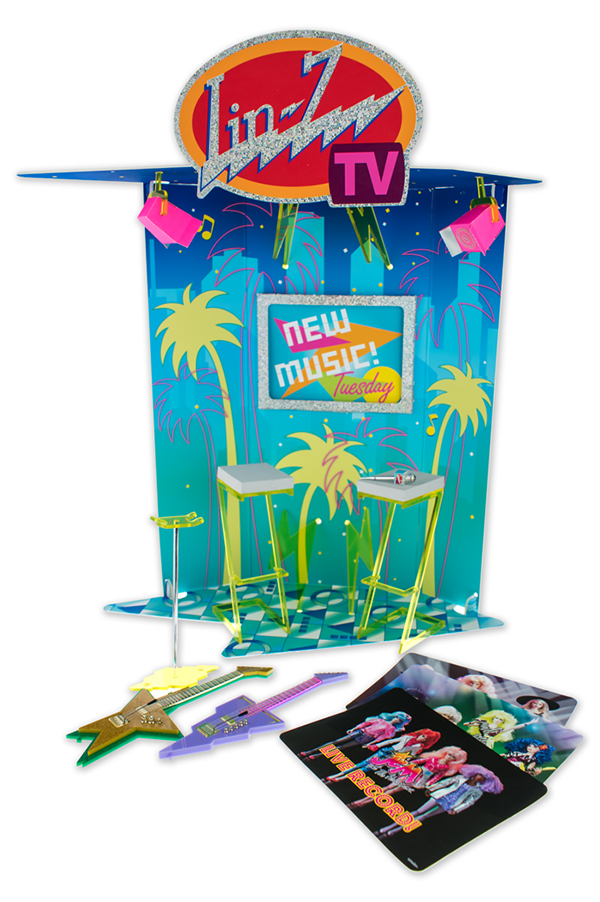
STEP 1. TV SCREEN FRAME
If you opted to construct the LIN-Z TV Studio, fold and install the TV screen frame as shown.
A/ Put a piece of double sided tape along the edge of the upper lip of the frame, peel the paper backing off the tape and fold the upper lip down to secure it in place and add rigidity to the frame.
B/ Fold the two side and bottom lips/edges.
C/ Insert into the slots located on the back wall (slot/opening goes on top).
D/ Slide the "screen" images into the frame, picking your favorite one to stand in as the "topic du jour" while Lindsey is doing her interviews!
STEP 2. LIN-Z TV SHOW SIGN
Use the two clear plastic pegs and the large double sided foam tape provided to assemble and click the LIN-Z TV logo sign in place. Tip: Install the clips on the edge of the ceiling first approximately 2 inches apart, install the tape on the flat surface, peel off the paper backing and position the logo. Note that this will be permanent once done, so make sure that the logo is centered and installed the way you like it.
ASSEMBLY STEPS FOR KJEM SIDE ONLY
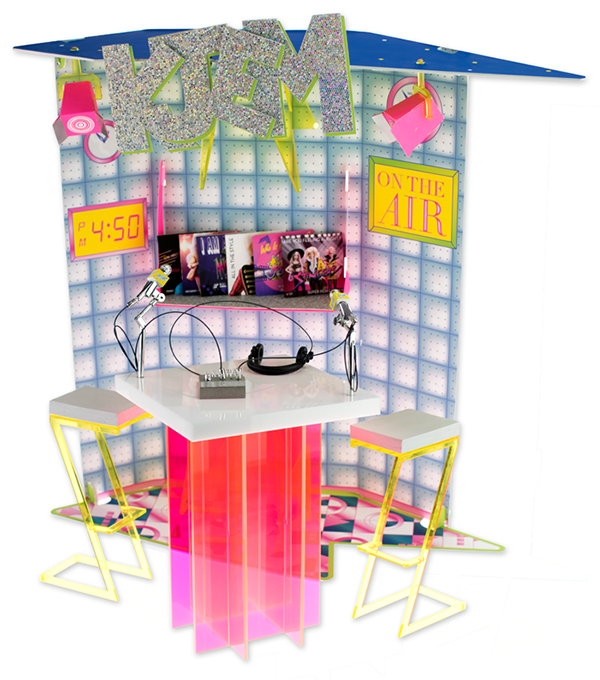
STEP 1. BACK SHELF
Every DJ needs a place to store their records! Gently fold and click the shelf to the back wall, the chrome side of the shelf should be on top!
STEP 2. MUSIC ALBUM COVERS
Using two small strips of clear double sided tape (not included), fold and assemble the sleeves of the music records. Store records inside the sleeves once done.
STEP 3. KJEM LOGO
A/ Attach the KJEM letters to one another using the smaller sized adhesive two-sided foam dots to form the logo. To help assemble the letters correctly, please use the template provided at this link:
https://www.integritytoys.com/instr/14095_KJEM_LOGO_Template.pdf
B/ Use the two clear plastic pegs and double sided foam tape provided to assemble and click the KJEM logo sign in place. Tip: Install the clips on the edge of the ceiling first approximately 2 inches apart, install the tape on the flat surface, peel off the paper backing and position the logo as indicated on the template above. IMPORTANT: As you are positioning the logo over the clips, slide the clips to align them with the edge of the "K" and the "M" so they don't show through the empty spaces of the logo. Use the dotted line reference on the template as a general guide.
ASSEMBLY STEPS FOR THE ACCESSORIES
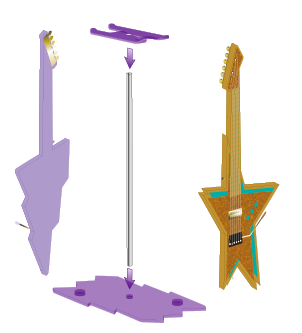
STEP 1. GUITAR RACK
Insert the pole into the center opening of the top and bottom pieces of the guitar rack as shown. The guitars are designed to fit on the rack as shown.
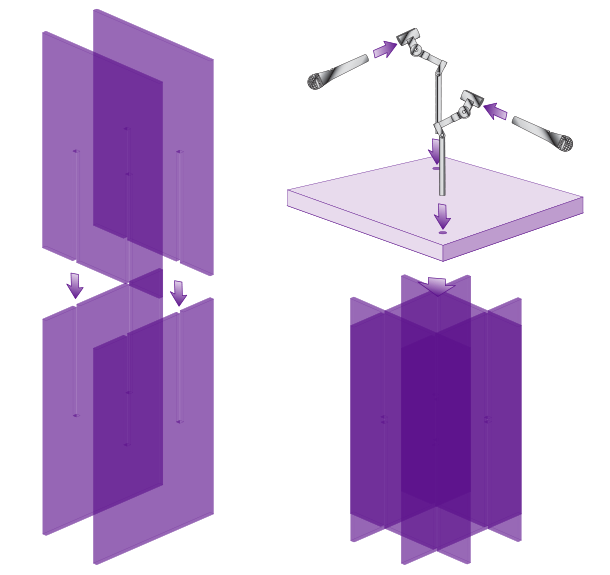
STEP 2. DJ DESK
A/ Slide the four leg panels into one another as shown.
B/ Install the table top on the leg assembly, aligning the square at the bottom with the central opening of the leg assembly as shown. NOTE: These two pieces will not "click" in place, so please be careful when putting weight on the table as the top may slide off.
C/ Insert a microphone stand in each of the openings on the table top as shown. Slide the microphones into the clips.
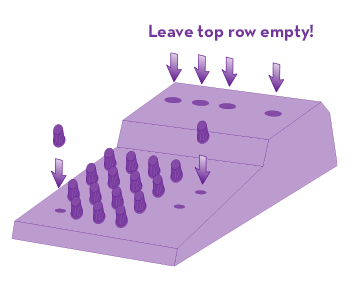
STEP 3. DJ MIXING CONSOLE
Using a tiny drop of model cement (not included), install the provided knobs and buttons as shown into the console piece. Leave the top row of holes open as this is where the microphones and the headphones will connect using the provided miniature power cords. WARNING: USE THE SMALLEST AMOUNT OF GLUE POSSIBLE, DO NOT GLUE THE MINI POWER CORDS IN, ONLY THE DIALS!
STEP 4. SEATS
The acrylic seats are designed to pressure fit together as shown. Gently assemble the pieces together according to the following diagram. Take your time and do not exert too much pressure as the acrylic parts are delicate and might break. Put the white foam cushion on top (use a small piece of clear double sided tape under the cushion to prevent it from slipping as needed).

STEP 5. MINIATURE MICROPHONE FLAGS
Whether you picked LIN-Z TV or KJEM, your stars will want to promote their favorite TV or Radio station by adding the provided microphone flags to their hand-held mics! Using the white "cross" shaped part first, fold into a tiny cube, then glue the station banner strip that you wish to have
over the cube. Make sure that you position the larger circular opening on top and the smaller one on the bottom; DO NOT COVER the openings! This is where the microphones will slide in.
Thank you for your purchase; we hope that you will cherish this playset as much as we had fun designing it!
|